


Recently, on our Samsung S4 downgrade article, we were asked whether or not the steps in the article would work on a Note 3. Our answer that was, in theory, the process of backing up the EFS partition of the phone, downloading the older ROM and then flashing it using Odin should work because both phones are manufactured by Samsung and so they process is near enough the same.
But before you downgrade the OS version there are a few things you need to consider.
1. Downgrading the OS will mean that ALL data is wiped from the phone.
2. Downgrading the OS to an older version means you will lose new OS features or updates.
3. If you downgrade and then root the phone you can no longer upgrade to new OS versions because software update is disabled due to the device being rooted.
Why downgrade the Android OS?
For one thing downgrading the Android OS to an older version can allow Android phones running OS 4.4.x to run FlexiSPY in FULL mode which means that, once the device is rooted, all FlexiSPY features will function provided you have rooted the phone before installing FlexiSPY.
Running an older OS version can also add features that were removed in newer version or improve stability and reliability, especially if the new OS has just been released and so can be subject to bugs and issues.
What Does an Android OS Consist Of?
If you want to take a closer look at what an Android OS consists of then backing up the Android phone using software such as EFS Professional can be used to tell you more about the software that runs the device.
The main Android OS partitions are as follows:
- BOOT – This contains information allowing the phone to boot up. Without this the phone will not start.
- SYSTEM – This contains the OS itself. This can be wiped and you can still use the phone in download mode to flash as new ROM because the information from the BOOT partition is still present.
- RECOVERY – This contains the recovery information. This allows you to perform alternate boot and maintenance options.
- USERDATA (or DATA) – This contains your user information such as contacts, SMS messages, settings and applications installed. Wiping this partition alone is the same as a factory reset.
- CACHE – This is where the Android OS stores frequently accessed applications components or data. Wiping this is fine, it automatically gets rebuilt once the device reboots.
- MISC – This is important as it controls miscellaneous settings including but not limited to the network carrier configuration and settings and USB information. Wiping this will result in parts of the phone no longer working.
- SDCARD – This is the SD card. Wiping this deletes all data on the SD card. On the Galaxy S devices this refers to the internal SD Card partition and not the actual SD card you insert which uses another partition.
We can examine more about an Android OS using backup tools such as EFS Professional.

In the above screenshot we have four partitions selected.
EFS – Contains the CSC information used in Odin (see below).
BOOT – Contains the bootloader information used in Odin (see below).
RADIO – Also contains important carrier information and settings.
SYSTEM – The actual OS itself that is currently installed.
How are Samsung OS ROMS flashed to the device?
Every Samsung phone has an operating system. This software is known as a ROM. When you downgrade the ROM the ROM you download can be one of two formats.
1st Possible Format – All in one – An all in one file that contains all the ROM partition information and is the easiest to flash.

2nd Possible Format – Separate parts (see below) with a file for each part and a PIT file to put it all together

As you can see above there is quite a difference between an OS ROM that is all in one and one that is separated but for either case you will need Odin, a PC based program, to flash the ROM and downgrade it.

The main buttons that you need to work with on Odin are as follows.
PIT – This is the partition information table. For some ROMS, even if you flash individual parts it will not work without the corresponding PIT file that tells the phone how everything is separated and laid out.
BL – Flash files to the device that only pertain to the bootloader (what happens when the phone boots up).
AP – Flash the main ROM file. This is the option most people will need to focus on.
CSC – This is the file that contains all the carrier and network information such as access point names and settings and other carrier/network related information.
An Android ROM (often several gigabytes in size) is partitioned (split) in to different sections with each section responsible for different features and functions which have been explained above.
So now that you know what an Android ROM is and what it consists of what happens next?
Always backup the Samsung Android device first
Before you do anything always back up the Samsung Android device first, just in case.
This can be done in a variety of ways but we prefer using EFS Professional.
To use this software you must make sure of three things:
1. The Samsung Android phone you want to backup has been rooted by you.
2. You have installed BusyBox on the Samsung Android phone from the Play Store.
3. You have installed the Android SDK on your PC correctly and ADB works.
Once you have made sure that the Samsung Android device meets the requirements download and run EFS Professional. We explain how to backup the phone and do all this here.
With the phone backed up to your PC using EFS Professional the backup file will look like this.

All successful backups are stored in the EFSProBackup folder and all the backups have the model name, as well as date and time of when the backup occurred.
At the time of writing this article the date is 9th September 2014, so, just to prove this works. We will backup the phone we are using for this article (Samsung Galaxy SIII – GT-I9300) using EFS Professional.

As you can see we have selected just the EFS partition this time to backup and this will be explained why in the next section.
We click the Backup button and the process starts – this can take some time and depending on how many applications you have installed and such the backup filesize may be large so make sure you have enough space on the phone itself or inserted SD card before starting the backup.
As you can see from the screenshot below the backup was successful.

And the saved backup folder on the PC is shown here which contains the EFS partition information.

As you can see the backup archive data matches the time of writing (9th September 2014) and the device name is that of the Samsung Galaxy S3 that we are using (GT-I9300).
When it comes to backing up a Samsung Android phone before downgrading the OS the only partition you really need to backup is EFS as we have done above (we still recommend you back up everything just to be sure) and we will explain why in the next section.
Find the ROM that is correct for your Samsung Android device
We touched upon this in our Samsung S4 downgrade article and showed the site to use to get the OS ROMs you are looking for.
So, for example, if you want to downgrade a Samsung Galaxy Note 3 running OS 4.4.x to 4.3.x or below in order to run FlexiSPY here is what you need to do.
1. Browse to http://www.samfirmware.com/
2. Click the Firmware tab at the top.
3. Click the Check your firmware option.
4. Search for the Samsung Galaxy Note 3 using the dropdown menu
So, it should look something like this.

Click Check firmware when done.
Note – In this example using the Note 3 we chose Thailand as the country but you would choose your own country (e.g. USA or UK) which means that the model number (SM-N900) may also be different.
You would obviously choose the Samsung Android phone model and country that applies to you which matches the Samsung Android phone whose OS you wish to downgrade.
5. The latest firmware will appear.
Click Download
6. Click the Download button again when ready to proceed (you may need to register a free account on Sammobile before you can download ROMS).
7. Click the Download button once more to start the download process and save the ROM file to your PC.
As you can see, the filesize is 1.3GB so the download may take some time. Once downloaded save it somewhere that is easy to access such as the desktop.
Get the Samsung Android phone ready
In order to flash the ROM to your Samsung Android phone you must perform a few tasks on your PC first.
1. Download Samsung Kies for your PC so that the phone is recognized by Odin when you connect it using the USB cable.
2. Download Odin.
3. Put the Samsung Android phone in recovery mode
— a. Turn off the Samsung Android phone completely
— b. Hold the volume down, home and power button together
— c. Wait for the phone to turn on and it should boot into download mode.
If you have done it correctly it will look like below and you then press the Volume up button to continue and it will be in download mode (this is using an S4 as an example but all Samsung Android phones will look the same in download mode).

4. Connect the Samsung Android phone to your PC using the USB cable.
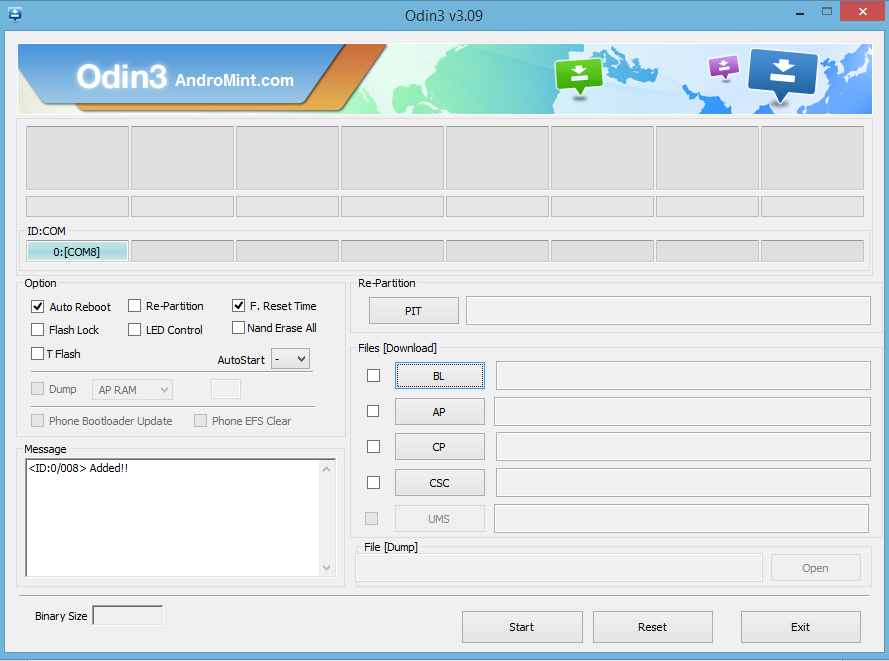
5. Open Odin and it will look like this if everything is done correctly (ADDED means that the phone has been successfully recognized by Odin.)
You now have two ways to add the ROM file into Odin.
1. If the ROM file is one file do the following:
a. Click the AP button
b. Browse to the ROM zip file and choose it.
2. If the ROM file is in more than one part do the following:
— a. Click PIT and add the PIT file.
— b. Click BL and choose the BOOT file.
— c. Click CP and choose the CODE file.
— d. Click CSC and choose the MODEM file.
Either way, once you have selected the correct way to flash the phone simply click Start to start the flashing process – this can take some time and please do not remove the phone from your computer in any way.
Once done successfully Odin will look like this.

The Samsung Android phone will reboot and you can disconnect it from your PC.
Booting up for the first time using the OS may take some time so please be patient. Once it boots up you have successfully downgraded your Samsung Android phone.
How to fix any issues after downgrading the OS
If the Samsung Android phone, after you flash the ROM, is stuck on the Samsung logo then do the following
Turn off the phone completely.
Hold down the Volume up, home and power buttons together.
Wait for the phone to display the Samsung logo and then let go.
It will no be in recovery mode which looks similar to this.

Using the Volume up and down keys scroll to wipe data/factory reset and press the Power button to confirm.
Scroll down to Yes and press the Power button on that to confirm.
The Samsung Android phone will then perform a factory reset.
When it is back on the screen shown above select Reboot and the Samsung Android Phone will restart and boot up – this may take some time when booting for the first time so please be patient.
If, after the phone has booted up you find that you no longer have a cell signal and that your IMEI number is incorrect – 004999010640000/01 (Settings > More > About Device > Status > IMEI) then you need to download the modem file from sites such as XDA forums, save it to your PC and extract it.

Put the Samsung Android phone in to download mode again and connect it to your PC and run Odin (see above for more information).
It will look like This Picture once connected as we have seen before.
Click the CP button and then point to the Modem binary file shown in the last screenshot

Odin should now look like This Picture . You can see the Samsung Android phone has been added and the modem file is selected.
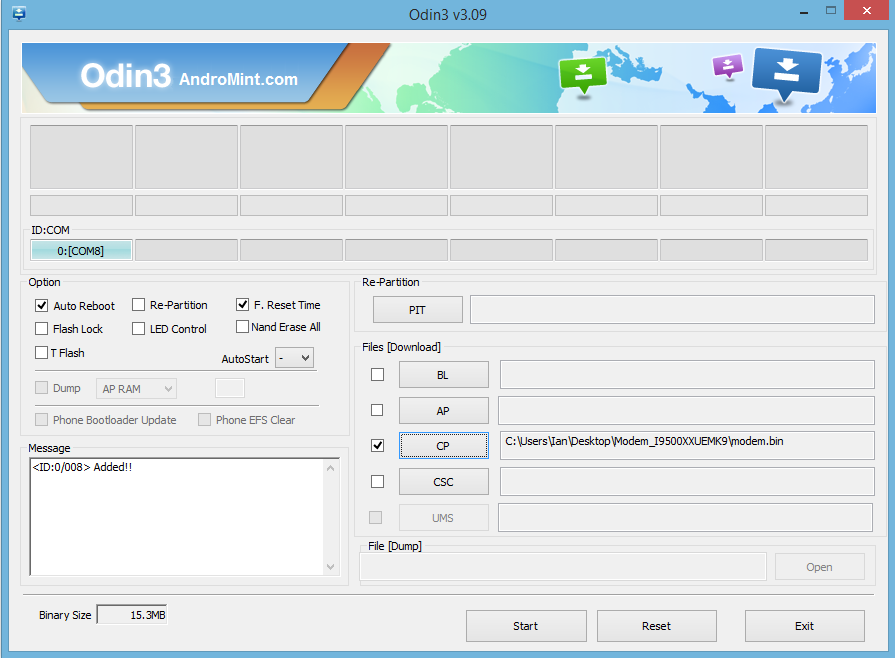
Click Start to flash the modem and wait.
DO NOT DISCONNECT THE SAMSUNG ANDROID PHONE FROM THE PC OR TURN IT OFF IN ANY WAY
Once it has been done wait for the Samsung Android phone to reboot and you should now have your working IMEI back and successfully downgraded the OS version.
As ever this guide is provided as is so if you have any issues or questions about this simply let us know in the comments and we will do our best to assist you.
Leave a Reply