x

Category: Советы и Хитрости Android

Читайте последние Android Советы & Трюки здесь, на блоге FlexiSPY

  • How to Find Hidden Apps on Your Child’s Android Phone

    How to Find Hidden Apps on Your Child’s Android Phone

    To find hidden apps on your child’s Android phone, check three places: the complete app list in Settings, the launcher’s hidden-app menu, and protected areas such as Android Private Space or Samsung Secure Folder. Start with Settings > Apps > See all apps, because an app hidden from the home screen will often still appear there.

    Whenever possible, review the phone with your child. A hidden app can be a safety concern, but it can also be a harmless game, a private journal, or an app they expected you to disapprove of.

    Quick checklist: where Android apps can be hidden

    Place to checkWhat you may findWhat to remember
    Settings > AppsMost apps installed in the phone’s main profileUsually the fastest and most complete first check
    Launcher settingsIcons removed from the home screen or app drawerThe app remains installed
    Android Private SpaceApps installed in a separate, lockable profileLocked apps may not appear in the main app list
    Samsung Secure FolderSeparate copies of apps stored in a protected folderThe folder icon itself can be hidden
    Disabled appsApps still on the device but removed from normal useThey may disappear from the launcher

    1. Check the complete app list in Settings

    The home screen and app drawer only show icons the launcher has been told to display. Android’s Settings menu gives you a better inventory of apps installed in the main phone profile.

    1. Open Settings.
    2. Tap Apps, Applications, or Apps & notifications.
    3. Select See all apps or App management.
    4. Review the list for names you do not recognize.
    5. Tap an unfamiliar app to view its permissions, storage, battery use, and mobile-data activity.

    Do not assume every unfamiliar name is a secret app. Android includes system services with technical names, and phone manufacturers often install their own utilities.

    If the menu offers a filter, check Disabled apps as well. Disabling an app can remove its icon without deleting its files from the phone.

    2. Look for apps hidden by the home-screen launcher

    Many Android launchers include a setting that hides selected apps from the app drawer. This is only a display change: the app normally remains installed and may continue to run.

    1. Touch and hold an empty area of the home screen.
    2. Open Home settings or Launcher settings.
    3. Look for Hide apps, Hidden apps, or similar wording.
    4. Review any apps selected in that menu.

    On many Samsung phones, the option is called Hide apps on Home and Apps screens. Other phone makers and third-party launchers use different names, so use the Settings search bar if you cannot find it.

    3. Check Android Private Space

    Android Private Space is different from an ordinary hidden-app menu. It creates a separate profile in which a person can install another copy of an app and protect it with a lock.

    According to Google, apps in a locked Private Space are stopped and hidden from places such as the launcher, recent-app view, sharing menus, and parts of Settings. That means the main See all apps list may not tell the whole story.

    1. Open Settings.
    2. Go to Security & privacy > Private space.
    3. Unlock the space if you are authorized to do so.
    4. Review the apps installed inside it.

    If the Private Space container has been hidden, search for Private Space in Settings or the app drawer. Availability and menu paths vary by device; Google’s Private Space guide has the current instructions.

    4. Check Samsung Secure Folder

    Samsung Secure Folder can hold separate copies of apps, accounts, photos, and files. Its icon can also be removed from the Apps screen, so you may need to find it through Settings.

    1. Search Settings for Secure Folder.
    2. On many Samsung phones, go to Security and privacy > More security settings > Secure Folder.
    3. Unlock the folder if you have the authority and credentials to access it.
    4. Review the apps stored inside.
    5. Check whether Add Secure Folder to Apps screen is turned off.

    Samsung changes menu paths between One UI versions. If these steps do not match the device, consult Samsung’s Secure Folder instructions.

    5. Check for disguised apps

    Some apps try to blend in by using a generic name or an icon that looks like a calculator, calendar, or utility. An innocent-looking icon is not proof that an app is dangerous, so inspect how it behaves before drawing conclusions.

    • Permissions: A basic calculator should not normally need contacts, location, camera, and microphone access.
    • Storage use: A simple utility using a large amount of storage may contain photos, videos, messages, or other saved data.
    • Background activity: Check whether the app uses significant battery or data when it is supposedly unused.
    • Developer: Look up the developer name and compare it with the app’s claimed purpose.
    • Install source: Find out whether it came from Google Play or another source.

    Look for a pattern of inconsistencies. Password managers, accessibility tools, work apps, and security products can legitimately request broad permissions.

    6. Use Google Play as a cross-check

    Open the Play Store, tap the profile icon, and select Manage apps & device. This can help you identify apps installed through Google Play or associated with the Google account.

    It is not a complete hidden-app detector. It may not show apps installed from another source, associated with a different account, or placed inside a locked profile.

    7. Run a Google Play Protect scan

    If you are concerned that an unfamiliar app may be harmful, run Play Protect after identifying it.

    1. Open the Google Play Store.
    2. Tap the profile icon.
    3. Select Play Protect.
    4. Tap Scan.

    Google says Play Protect checks apps for harmful behavior and may warn about, disable, or remove a harmful app. See Google’s Play Protect guidance for current settings and scan instructions.

    How FlexiSPY can help you review installed apps

    For ongoing checks on a child’s Android phone you manage, FlexiSPY provides Installed Applications and Application Activity reports on its Android plans. These reports can help you review ordinary installed apps and see which apps are being used from the web dashboard.

    FlexiSPY dashboard showing installed applications on an Android phone

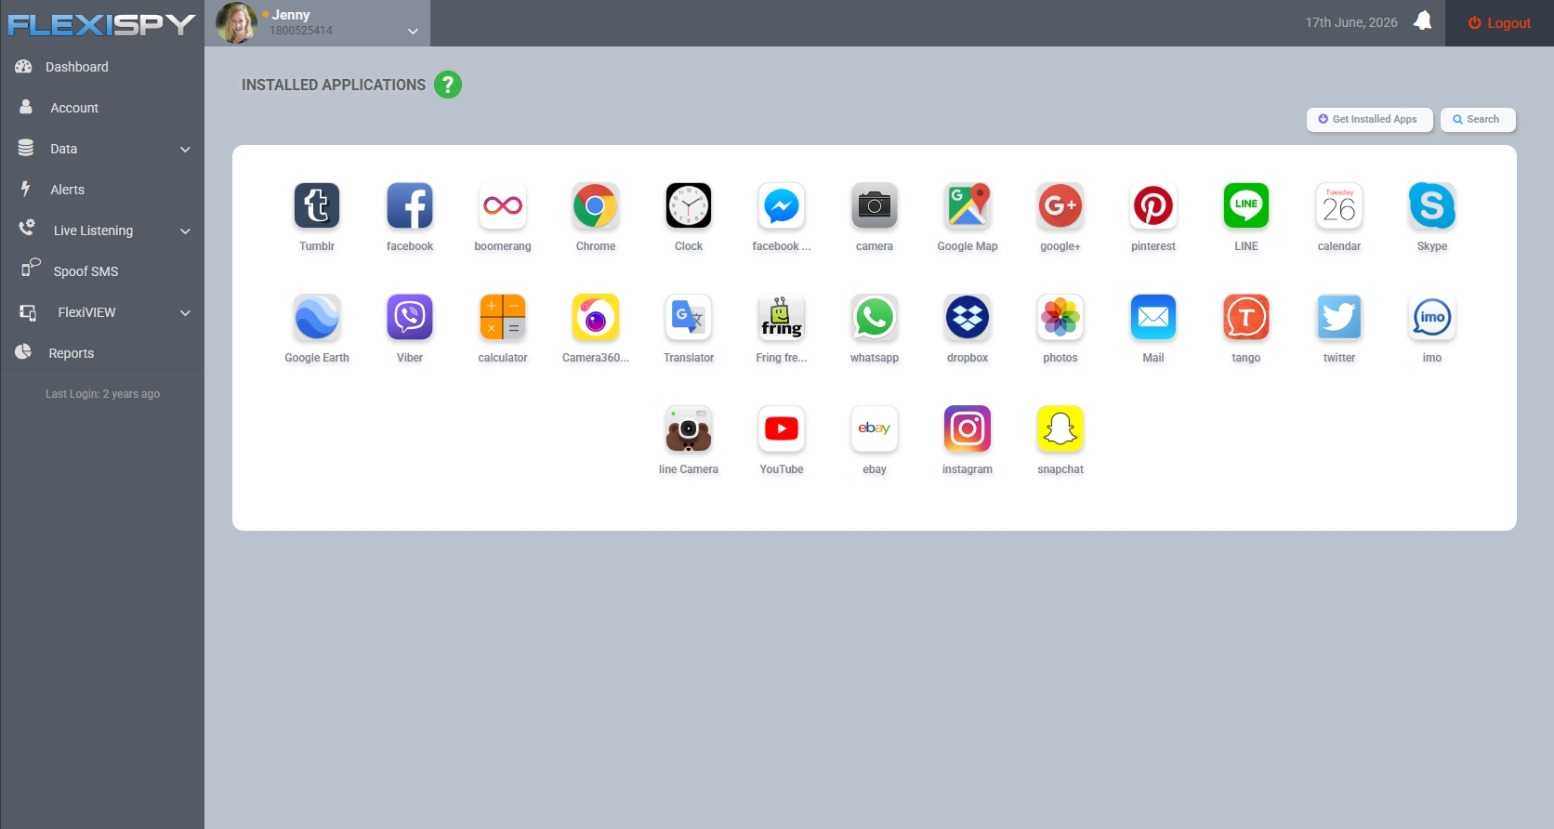
    This can be useful when an app’s launcher icon has been hidden or when you need a clearer record between in-person phone reviews.

    What to do when you find an unfamiliar app

    Finding the app is only the beginning. Before deleting it, work out what it is, what information it can access, and why your child installed it.

    1. Identify the app. Check its developer, Play Store listing, permissions, install source, and recent activity.
    2. Ask your child about it. Give them a chance to explain what they use it for and why it was hidden.
    3. Assess the actual risk. Look for contact with strangers, location sharing, explicit content, hidden purchases, or misleading age information.
    4. Reduce unnecessary access. Revoke permissions the app does not need and turn off unwanted notifications, purchases, or location sharing.
    5. Remove it when appropriate. Uninstall harmful or unsuitable apps from a device you are responsible for managing.

    If the app contains evidence of threats, grooming, blackmail, or sexual exploitation, preserve relevant screenshots and account details before removing it. Contact the platform, school, or appropriate authorities when the situation warrants it.

    Turn the discovery into a better phone rule

    A technical inspection can solve today’s mystery, but it will not prevent the same conflict next week. Agree on clear rules for which apps require permission, what kinds of privacy your child can expect, and when you will review the phone together.

    A younger child may need regular app checks. A teenager may respond better to narrower checks tied to a specific concern, with more privacy restored as they demonstrate sound judgment.

    If you need controls beyond app inventory, our guide to the best parental control apps explains how different approaches compare.

    Use monitoring only on a device and account you are legally authorized to manage. Privacy, consent, and recording laws vary by location, so check local law or seek legal advice if your authority is unclear—especially when the device belongs to another adult.

    Frequently asked questions

    Do hidden apps appear in Android Settings?

    Apps hidden only from the home screen or app drawer usually still appear under Settings > Apps. Apps inside a locked Private Space or another protected profile may not appear in the main list.

    Can an Android app look like a calculator?

    Yes. Some vault apps use calculator-style icons or interfaces, but many ordinary calculator apps are legitimate.

    Check the app’s developer, permissions, storage use, and behavior instead of judging the icon alone.

    Can the Play Store reveal every hidden app?

    No. It is useful as a cross-check, but it can miss apps installed outside Google Play, apps connected to another account, and apps inside a separate protected profile.

    What is the fastest way to check for hidden apps?

    Compare Settings > Apps > See all apps with the visible app drawer. Then check the launcher’s hidden-app menu, Android Private Space, and Samsung Secure Folder if those features are available.

  • Android Call Recording: How To Get The Best Results

    Android Call Recording: How To Get The Best Results

    Not quite sure how to setup and use our Android Call Recording feature? Or maybe you HAVE set it up and even recorded a call, but when you listened to the recording something just didn’t sound right..

    If we’ve hit the mark, then you’ll be glad to know that in this post we’ll show you how to maximize the chances of getting a perfect recording every time.

    (If you are interested in iPhone Call Recording, we cover it in another post)

    So let’s begin!

    Finding The Best Android Call Recording Source

    To better understand why call recordings aren’t always clear, you should understand how our Call Recording feature works.. Basically, when FlexiSPY first activates it tries to automatically find the best call recording method, and it has several sources to choose from.

    Usually the microphone source works best, and it may choose that. But —  there may be a better recording source for your device.

    Better Results Through Manual Settings

    FlexiSPY sometimes can’t automatically find the best audio source. The reason is complicated, but the short version is that there are so many variations of android devices, all running on different networks, that FlexiSPY sometimes gets it wrong.

    You’ll know that this happened if:

    • Only one side of the conversation gets recorded.
    • You can only hear static
    • The recorded voices sound distant

    Fortunately, this is where manually setting the audio source can help. Through the manual settings you can test which source works best for the device that FlexiSPY is installed on.

    Here’s how to manually set the audio source:

    1.       Log into your online portal.

    2.       Click Control Center.

    3.       Click Call Controls.

    4.       Click Set Audio Recording Source.

    All the possible call recording sources will then appear.

    set-audio-recording-source

    Here’s a breakdown of the sources:

    Microphone

    This is the call recording source that FlexiSPY uses by default.

    (Samsung devices work well on this setting)

    Voice Call

    This source uses both directions (known as uplink and downlink) to increase the chances of recording both sides of a call. It may not work with all devices though — if it fails it will result in the recording of only one side of the call.

    AOSP

    This is a proprietary recording source for all devices.

    (non-rooted Motorola and Huawei Android devices should choose this source for best results.)

    Legacy

    This is the oldest and most stable form of call recording. But on newer Android devices both sides may not be recorded.

    (If all other call recording sources produce unsatisfactory results, then use this.) 

    ALSA 

    This source is for rooted Android devices only.

    So if you’re unhappy with Call Recording and the device is unrooted you’ll want to:

    1. Deactivate & Uninstall FlexiSPY from the device
    2. Root the device
    3. Reinstall & Reactivate FlexiSPY
    4. Set ALSA as the Call Recording source

    Conclusion

    There’s no universal Call Recording source that works for every Android device. But if you try all the sources we mentioned in this article, there’s a good chance that your recordings work just fine!

  • Sending Commands To Your Android Device With FlexiSPY

    Sending Commands To Your Android Device With FlexiSPY

    Sometimes you might want to change a capturing setting in the FlexiSPY control panel. Maybe you’d like to activate our Ambient Recording feature, or change what app’s you’re monitoring. Whatever the case, you’re given the option to choose the method that FlexiSPY will use to send the changes to the phone.

    There are three ways to for sending commands to your Android device using FlexiSPY.

    1. Network (FREE, works on all mobiles)
    2. Push Notification (FREE, but not available on all mobiles)
    3. SMS commands (requires purchase of SMS credits, works on all mobiles)

    SMS credits are an optional way to send commands to FlexiSPY. They are used within Control Center in your online account to make sure time sensitive commands are processed immediately (e.g. Send Immediate – to send all data not yet uploaded immediately to your online account.)

    The default is push notifications, or network. But these are sometimes slow, and can take an hour to arrive – which is perfectly fine for most users.

    SMS commands arrive instantly, and are appropriate for professional use, where timing is important. You can always send SMS commands from your own mobile device, so you don’t ever need to buy SMS credits.

    But for those users who value convenience, and the best possible performance, we give them the option to buy credits directly from inside the account portal inside your account tab.

    Let’s take a look at how push notifications work;

    Everything takes place inside the Control Center in your online account.

    how-push-notifications-work

    Just browse to the category for the command you wish to set and set the options you want to change.

    set-the-options-you-wish-to-change-flexispy

    Click Sync Now when done and wait for the push notification to be sent to the Android TARGET device.

    click-sync-now

    With the push notification sent to the device the changes will then be applied.

  • What Is ADB And How Do I Use It?

    What Is ADB And How Do I Use It?

    Disclaimer: While installing ADB is a safe process, please follow all the steps carefully. FlexiSPY is not responsible for any damage or data loss through following this article and all steps are correct at the time of writing. Create a Windows system restore point at any time if you are unsure. Performing these steps is your own responsibility.

    If you are a casual Android user who just uses their phone for Facebook, Clash of Clans, calls and emails then you most likely won’t be interested in ADB or what it is. But for those who like to tinker with the plethora of Android customization options available to the platform ADB is an integral part of the experience.

    But what is ADB and why should Android owners become familiar with it?

    When you plug in your Android phone or table to your PC Windows will happily display the contents of the phone for you to work with. This can be internal storage or external storage from an Sdcard you have inserted. But surely you must have wondered, what else is on my phone and how can I get access to it?

    ADB is the answer

    ADB stands for ‘Android Device Bridge’ and is a set of tools for your PC that allows you to interface with your Android phone at the very lowest level in terms of system and processes. You essentially can access all areas of your Android phone and its filesystem instead of the areas deemed safe by the manufacturers that only Windows can see.

    ADB allows you to perform advanced operations on your Android phone that you would otherwise normally not be able to.

    But what are these ‘advanced operations’ you mention?

    Usually ADB is commonly used for rooting.  An Android phone software is powered by the Android OS which is based on Linux. On Linux there are certain levels of user responsibility, the highest being superuser which allows you to change anything.

    Your Android phone is the same. By default the filesystem of the phone is locked down by the phone manufacturer but you can gain full and complete access to the device by gaining root (hence the term ‘rooting’). This lets you do anything you want on the phone and ADB helps make this happen.

    So if you want to root an Android phone or perhaps install a custom ROM or basically just perform advanced tasks on your Android phone then you’ll need ADB so let’s install it.

    What is needed to install ADB?

    To install ADB you will need a PC. You will need to download and install the Android SDK which you can get from here.

    get-the-adb

    Once you have downloaded the Android SDK save it to an easy to remember folder, for this article we are going to use C:\Android on the PC we are using to write this article.

    save-it-to-an-easy-to-remember-place

    Here we have downloaded the Android SDK to the desktop.

    We will now extract the contents of the folder.

    adt-bundle-windows
     

    eclipse

    The above screenshots show what is inside the extracted SDK. We will now make a new directory on our C drive called Android and we will copy the three folders shown above.

    If you are wondering, you simply navigate to SDK > platform-tools and ADB will be shown along with Fastboot which is also needed if you are rooting

    adb_exe

    Note: You will not see a platform-tools folder after you extract the SDK. You must install it first which we discuss now.

    How do you configure ADB?

    To configure ADB and make sure you have the right packages installed launch SDK Manager.

    sdk-manager1

    Because you are running it for the first time it will ask you which packages you wish to install, we must install Platform-tools because this is what contains ADB.

    choose-packages-to-install

    Just make sure Android SDK Platform-tools is checked, click Accept and then click Install.

    Installing all the packages may take some time – please be patient.

    When all packages are install the SDK Manager should look like this.

    what-it-will-look-like-after-packages-are-installed

    As you can see, Android SDK Tools and Android SDK Platform Tools are both installed.

    Set the Windows ADB path variable

    Based on which version of Windows you have (we are using Windows 8.1) the steps here may be a little different. Basically we need to tell Windows that the SDK actually lists and has its own unique path. That way, when ADB is invoked by a program (e.g. a rooting tool) it knows where to find the required file inside your SDK installation folder.

    Because you are modifying system variables and paths you may want to create a Windows system restore point first.

    You need to access Advanced System Settings.

    To do this (on Windows 8.1), press the Windows key + S to bring up the search box and type Advanced System Settings and click the entry that appears.

    advanced-system-settings

    On the menu that appears click Environment Variables.

    environment-variables

    The environmental variables window will appear and this is what we need to edit.

    what-is-needed-to-edit-appears

    Under System Variables, scroll down to Path and click Edit.

    path edit

    Note: Do not delete the variable value field in any way.

    Instead, append it. At the end, add the following line (include the ; at the start):

    ;c:\android\android-sdk-windows\tools;c:\android\android-sdk-windows\platform-tools

    Note: Remember that we installed our Android SDK to C:\Android? Your SDK folder location may be different so please make sure you update the variable value field with the correct path.

    Click OK when done.

    Now that you have done that you need to install the Android USB drivers.

    Installing USB drivers using the SDK Manager

    For many Android phones, once you have connected them to your PC, they require their own special set of drivers for Windows to be able to recognize them and allow you to interface with it using ADB.

    To do this, inside SDK Manager, scroll down to Extras.

    google-usb-driver

    Make sure Google USB Driver is selected and then install it.

    The Google USB driver should work for most Android devices once they are plugged in to your PC but not all phone manufacturers require the use of ADB however you should always make sure that you have installed the latest USB drivers for the Android device you wish to root on to your PC.

    These are available to download below.

    1. Samsung (install Samsung Kies)
    2. HTC
    3. Motorola
    4. LG
    5. Sony
    6. Huawei
    7. ASUS
    8. Lenovo

    Now that you have done that there is one more final thing to do.

    Test that ADB works correctly

    Now that we have set up ADB and installed the Android USB drivers it is time to test it all work.

    • Plug in any Android phone to your PC using its USB cable.
    • On the Android phone enable USB debugging. To do this go to Settings > About Phone (or About Device) and tap build number until the Developer Options menu is enabled.
    • Once inside the Developer Options menu make sure USB Debugging is checked.

    usb-debugging-on

    • On your PC open up a Windows command prompt by opening Run (Windows key + R) and then entering cmd and then press Enter.

    press-enter

    In the command prompt window type adb devices and press Enter.

    If everything is working properly the command window will display the device data as shown below.

    type-adb-devices

    Congratulations! You have now successfully setup and configured ADB for your Android phone and you can perform many additional tasks such as rooting, OS upgrading, OS downgrading and other custom options.

  • How To Backup Your Android Phone Using Just The Device Itself

    How To Backup Your Android Phone Using Just The Device Itself

    Here on the FlexiSPY blog we love to customise our devices and root them and jailbreak them but we understand that this does not come without risk. Therefore, in this article we will explain how you can quickly and safely backup the entire contents of your Android phone.

    The benefits of doing this are numerous such as if you decided to downgrade the OS or install a custom ROM for example – backing up the Android phone can often be a lifesaver.

    Disclaimer: FlexiSPY is not responsible for any loss of data or damages incurred from following the directions given. The directions were accurate at the time of writing. Please make sure you follow the rooting guide correctly if you need to root your phone first and make sure your phone has enough storage space to perform a backup before proceeding.

    What is needed to backup the Android phone?

    To backup the Android phone you will need the Android phone in your hand and, depending on the method of backup (discussed later) a PC may also be required.

    What is the easiest way to backup an Android phone?

    The easiest way is on the device itself and even though you think that means you do not need a PC it actually does. This is because you need to have rooted the Android phone first to install a custom recovery on it and it is through booting in to this custom recovery that you can then perform a full backup of the phone.

    Usually this is to the SD card that you have inserted but what if you do not have an SD card? You can save the backup to the internal memory of the Android phone but if the phone is restored or reset you risk losing the backup so you still need a PC to transfer the backup file (which can often be large such as several gigabytes) to a PC for safekeeping.

    To backup the Android phone itself, as mentioned, you will still need a PC to transfer the backup file from the Android phone to the PC for safekeeping once the backup is complete. However you also need to make sure that the Android phone you want to backup, on the device itself has been rooted as well.

    Why is this?

    Because rooting a phone is what installs a custom recovery. It is the custom recovery that has the feature that allows for the Android phone to be backed up directly to the device to start with.

    You can find out more on what rooting is and why it can be a good thing by reading this article.

    Essentially backing up the phone directly to the device consists of three steps.

    1. Root the phone (this installs the custom recovery mode)
    2. Backup the phone using the device itself and custom recovery
    3. Transfer the backup file to a PC for safekeeping

    For the sake of this article we are going to assume that you have already rooted your Android device. If you haven’t and you want to know how to root some of the more popular Android handsets then be sure to check out rooting help here.

    So how do you backup the phone to the device itself?

    First of all you must boot the phone in to recovery mode.

    To do this you do the following:

    1. Turn the phone off completely.
    2. Hold down the Volume Up, Home and Power buttons together.
    3. Wait until the phone boots up.

    Providing you have done this correctly the phone will boot up and it will look like below. If your phone does not boot in to custom recovery mode then it most likely has not been rooted so please remember to root it first otherwise this article cannot be followed.

    Use the volume up and volume down keys to select and the power button to confirm.

    Clockword recovery mod

    From the main menu choose backup and restore.

    On the menu that appears choose the backup option.

    From the main menu choose backup and restore.

    The backup process will start – please be patient, this may take some time.

    Once it is complete you need to transfer the backup file to a PC for safekeeping.

    This is done by doing the following:

    1. Reboot the phone after using the recovery mode to backup the phone. — The Android phone will be recognised by Windows.

    android-phone-is-recognized

    Double click Phone. The contents of the phone internal memory will be displayed.

    Double-click the clockworkmod folder.

    navigate to the clockword mod backup on your phone

    Inside the clockwork mod folder you’ll find that there are no backup files of any kind.

    So where are they?

    This is why you need root access.

    The clockworkmod backups are actually located on the Android phone in /mnt/shell/emulated/clockworkmod/backup.

    We will show you how to find the backup files using ES File Explorer which is freely available on the Play Store.

    Simply search for ES File Explorer on the Play Store and install it.

    Once it’s installed, run the program

    You now need to get root permissions from the application to find the hidden location where the backups are stored. This option is found in the Tools menu.

    es-file-explorer-pro-tools-menu

    In the Tools menu set Root Explorer to ON and grant root permission when asked.

    Once root permission has been granted browse to the original file location — /mnt/shell/emulated/clockworkmod/backup

    This time the folder will not be empty and the backups will be listed.

    backups-are-listed

    If you open up any backup folder you can verify the contents.

    But now that we have found the backups how do we get that folder on to our PC for safekeeping?

    By copying the backup folder to a folder on the Android phone that the PC can access such as the Downloads folder.

    To copy the folder press and tap the folder icon and then tap Copy that appears at the bottom of the screen.

    You then need to browse to the main downloads folder.

    browse-to-main-downloads-folder

    When you have reached the Download folder tap the Paste button to start copying.

    Wait for the copying process to be completed – this may take some time.

    Now that you have copied the backup file to a folder that your PC can access on the Android phone we can now copy it to our PC for safekeeping.

    To do this make sure that you have plugged your Android phone in to your computer. Once it is plugged in simply browse the phone until you reach the Download folder.

    browse-the-phone-until-you-have-reached-the-download-folder

    Inside there will be the backup file we copied previously

    backup-located

    As you can see, backup folders are there. Simply copy these folders to a convenient place on your PC for safekeeping and everything is complete.

    You have now successfully backed up your phone entirely. We will discuss how to restore these backups in a separate article.

  • КАК ЗАПИСЫВАТЬ ЗВОНКИ С ПОМОЩЬЮ FLEXISPY И ТЕЛЕФОНА НА БАЗЕ АНДРОИД

    Возможность записывать чужие телефонные звонки может


    стать началом множества крутых шпионских историй.

    С FlexiSPY вы сможете легко записывать чужие телефонные разговоры и прослушивать их на досуге, с комфортом, на своем компьютере.

    Как это можно сделать?

    Вам понадобится 3 вещи

    1. Смартфон на базе Андроид
    2. Лицензионный FlexiSPY, купленный на http://www.flexispy.com/ru
    3. Шаг 3 – Войдите в Кабинет пользователя.

    Если все вышеуказанные требования выполнены, вы можете начинать записывать разговоры.

    Приступим!

    Шаг 1 – Возьмите в руки телефон, за которым вы хотите следить.

    Шаг 2 – Установите FlexiSPY на этот телефон и активируйте программу.

    Шаг 3 – Войдите в Кабинет пользователя.

    FlexiSPY Portal

    Шаг 4 –ВыберитевкладкуControl Center инажмитенаCall Controls.

    FlexiSPY Call Controls

    Шаг 5 – ВыберитеEnable Call Recording.

    EnableCallControls

    Шаг 6 – Выберите опцию «On», если она еще не выбрана

    settoon

    Шаг 7 – ВыберитеLive Call Controls. Затем – ManageWatchlist

    FlexiSPY Managewatchlist

    Шаг 8 – Убедитесь, что все поля во вкладке GlobalOptions отмечены.

    FlexiSPY All Options Checked

    После этого любой звонок, сделанный с этого смартфона, будет записан программой FlexiSPY. Запись разговора будет передана с Андроида в ваш Кабинет пользователя.

    Шаг 9 – Чтобы прослушать записанные звонки, нажмите на AudioImprint  и выберите Calls

    FlexiSPY Audioimprint

    Шаг 10 – Записанный разговор виден внутри вашего Кабинета пользователя.

    FlexiSPY RecordedCallIsVisible

    Шаг 11 – Нажмите Download, чтобы сохранить запись на компьютере и прослушивать позже.

    Вот и все!

    Мы надеемся, что эта короткая статья помогла вам понять, какими широкими возможностями обладает программа FlexiSPY на смартфонах с операционной системой Андроид. Но FlexiSPY может намного больше обычного перехвата звонков! Следите за новыми статьями, объясняющими, как пользоваться абсолютно каждой функцией FlexiSPY

  • КАК СЛЕДИТЬ ЗА ЧУЖИМИ АУДИО ЗАМЕТКАМИ С ПОМОЩЬЮ FLEXISPY И ТЕЛЕФОНА НА БАЗЕ АНДРОИД

    SpyingOnAudioMessages

    С аудио заметками очень просто и удобно работать. Вы можете записывать интервью, свои текущие мысли, музыку на концертах, можно даже настроить приложение таким образом, что оно будет самостоятельно отсылать сделанные записи на вашу электронную почту – невероятно полезная функция. Но иногда люди используют аудио заметки для более гнусных целей. Возможно, ваш работник записывает конфиденциальную информацию на бизнес встречах, ваш ребенок – указания, чтобы посетить дом незнакомца, или ваш муж записывает милые любовные послания своей «просто коллеги». Нельзя угадать, что в этих заметках, не прослушав их. Но если их все-таки записали, вы, несомненно, услышите важную информацию.

    Что нужно для начала записи аудио заметок?

    1. Наблюдаемый телефон на базе Андроид
    2. Программа FlexiSPY, купленная на http://www.flexispy.com/ru
    3. 15-20 минут времени (это зависит от марки и модели смартфона)

    Если все вышеуказанные требования выполнены, вы можете начинать следить за установленными приложениями других людей.

    Итак, приступим!

    Шаг 1 – Возьмите в руки телефон, за которым вы хотите следить. Убедитесь, что модель телефона поддерживает FlexiSPY

    –\\ Если у вас есть вопросы по поводу этой обучающей статьи, свяжитесь со службой поддержки FlexiSPY, и вам с радостью помогут\\–

    Шаг 2 – Установите FlexiSPY на этот телефон и активируйте программу.

    Шаг 3 – Войдите в Кабинет пользователя FlexiSPY.

    FlexiSPY Portal

    Шаг 4 – Выберите вкладку Control Center

    ControlCenter

    Шаг 5 – Нажмите на Photo Controls.

    PhotoControls

    Шаг 6 – Выберите Historical Media.

    HistoricalMedia

    Шаг 7 – Поставьте опцию Get Audio врежим On.

    GetAudioOn

    Шаг 8 – Выберите Sync Now.

    SyncNow

    Шаг 9 – Должно появиться уведомление о том, что команда была послана успешно.

    Confirmation

    Аудиозаписи телефона будут перехвачены и загружены в ваш Кабинет пользователя примерно в течение часа.

    Примите к сведению, что в зависимости от размера файла и скорости интернет-соединения на смартфоне, процесс может занять некоторое время.

    Шаг 10 – После этого перейдите во вкладку Media и выберите Sounds

    MediaSounds

    Шаг 11 – Вы увидите ярлык загруженного файла

    GetFile

    Шаг 12 – Нажмите Get File для загрузки полного аудиофайла в ваш Кабинет пользователя FlexiSPY.

    GetAudio

    Шаг 13 – Выберите Get Audios для начала процесса загрузки аудио на ваш компьютер.

    GetAudioFinal

     Готово

    На этом – все

    Если вы считаете эту статью полезной, прочтите нашу статью об отслеживании приложения WhatsApp Chats For Android. Если у вас появились какие-либо вопросы, без колебаний задавайте их ниже в комментариях, в социальных сетях или с помощью онлайн чата!

    Следите за нашими новыми статьями, объясняющими, как пользоваться абсолютно каждой функцией FlexiSPY.

  • ЗАПИСЬ ОКРУЖЕНИЯ С FLEXISPY НА АНДРОИДЕ

    Вы когда-либо хотели прослушивать чужие телефоны, чтобы знать правду ли вам говорят о своем местоположении? Такое можно встретить только в шпионских фильмах, в воображении сразу возникает Шон Коннери со своими шпионскими «жучками». Но теперь даже обычному человеку под силу вести прослушку.

    Как это возможно?

    Вам понадобятся только 3 вещи.

    1. Наблюдаемый телефон на базе Андроид
    2. Программа FlexiSPY, купленная на http://www.flexispy.com/ru
    3. 15-20 минут времени (это зависит от модели смартфона)

    Шаг 1 – Возьмите в руки наблюдаемый телефон

    //Если у вас есть вопросы, свяжитесь сослужбой поддержки FlexiSPY, и вам с радостью помогут//

    Шаг 2 – Установите FlexiSPY на этот телефон по инструкциям из личного кабинета FlexiSPY и активируйте программу.

    Шаг 3 – Войдите в свой личный кабинет FlexiSPY.

    FlexiSPY Portal

    Шаг 4 – Выберите вкладку ControlCenter и нажмите на Call Controls.

    FlexiSPY Call Controls

    Шаг 5 – Нажмите Start Ambient Recording.

    StartAmbientRecording

    Шаг 6 –Установите длительность записи, передвинув слайдер на нужную позицию (длительность варьируется только в пределах от 5 до 60 минут)

    Start Ambient Recording Now

    Шаг 7 –Нажмите наStart Ambient Recording Now

    Запись начнется примерно через час после нажатияStartAmbientRecordingNowи будет длиться указанный отрезок времени.

    Имейте в виду, что время загрузки записи в ваш личный кабинет зависит от качества интернет-соединения на используемом Андроиде, так что процесс может занять некоторое время.


    Шаг 8 –Чтобы прослушать запись после загрузки выберитеAudioRecordingsи нажмитеAmbient.

    Ambient

    Шаг 9 –Запись окружения будет воспроизведена.

    Download Recorded File

    Шаг 10 –Для загрузки файла на компьютер и его воспроизведения выберите Download.

    Save Download

    Шаг 11 – Запись будет воспроизведена на компьютере.

    RecordingWillPlay
    Готово

    Мы надеемся, что эта короткая статья помогла вам понять, какими широкими возможностями обладает программаFlexiSPY на смартфонах с операционной системой Андроид. Помните, чтоFlexiSPY может намного больше обычного перехвата звонков! Следите за новыми статьями, поясняющими, как пользоваться абсолютно каждой функцией FlexiSPY

  • Spy Software Visibility | Is Your Spy Software Really Hidden?

    All spy software products promise to be “completely hidden,” “undetectable,” “totally invisible” or similar. But are they really? If your spy software isn’t truly hidden, not only will it ultimately fail in the end, but you may also end up seriously busted.

    Stealth
    Stealth is important when purchasing Spy Phone software

    In this series of Visibility articles we discuss the importance of stealth operation and investigate how well each application truly remains hidden.

    We’ll be looking at StealthGenie, MSpy, Mobile Spy and MobiStealth, and comparing each of these with FlexiSPY. We’ll also give you screenshot examples of what we found. This series compares the major spy software and monitoring apps for the Android platform.

    Stealth operation comes down to a handful of important questions such as:

    • Is the application itself well hidden or can it be easily found and disabled by the user? Is it found by anti-virus and security apps?
    • Does the monitoring app interfere with normal use of the phone?
    • Does it eat too much battery or consume noticeable amounts of data?
    • Does it bring attention to itself in other ways?

    Stealth operation is more than just hiding an icon. All of FlexiSPY’s competitors are only partially hidden at best. Whether advertised as discreet, hidden or even fully invisible, the software can still be found in numerous ways. Sometimes it’s even easier than you’d expect.

    • Sometimes an app may be found directly from the Application Manager itself. From there an experienced user can track its resource and data usage, kill its running processes or even uninstall it.
    • Another monitoring app may be spotted by an antivirus utility, notifying the user with a warning to the screen and an offer to automatically uninstall it.
    • Other apps may leave behind the icon to a rooting utility that was installed as a dependency.
    • If not hidden properly, a wealth of system utilities can also report on the app’s percentage of battery, CPU time, memory and total data usage.

    FlexiSPY’s Visibility series deals with the actual visibility level of the main spyphone competitors in five basic areas. You can find these articles on SpyPhoneReview here, or directly at the links given above.

    For even more information, we’ve also conducted in depth reviews covering visibility and more which can be found here.


    Explore All Our Great Features


    Snuck up on ya. Stealthy huh?

    jet2


  • Как следить за чатом Viber на iPhone?

    Viber Logo - FlexiSPY


    Viber относительно новый чат для обмена мгновенными сообщениями по сравнению с подобными чатами — Skype, WhatsApp или LINE, но он не менее популярен.

    Если интересующий вас пользователь тратит много времени в Viber, то приложение FlexiSPY с его возможность перехвата чатов,  позволит вам удаленно читать то, что происходит в мессенджере Viber на телефоне .

    Далее вы найдете описание нескольких шагов — как шпионить за чатом Viber на iPhone с помощью приложения слежения.

    3 простых шага – как удаленно читать мессенджер Viber

    с помощью приложения FlexiSPY, установленного на наблюдаемом телефоне :

    Шаг 1 — зайдите в ваш личный кабинет

    Шаг 1 - зайдите в ваш личный кабинет

    Шаг 2 — откройте раздел Сообщений, нажмите IM и затем выберите Viber

    Шаг 2 - откройте раздел Сообщений, нажмите IM и затем выберите Viber

    Шаг 3 — Читайте все перехваченные сообщения с телефона

    Шаг 3 - Читайте все перехваченные сообщения с телефона

    Вот и все!

    Мы надеемся что короткая статья покажет вам насколько мощные возможности у приложения FlexiSPY, установленного на iPhone. И, конечно, эти возможности не ограничиваются перехватом чата Viber! Следите за новыми статьями, объясняющими, как пользоваться абсолютно каждой функцией приложения.

  • What Local Android Call Recording Is & Why FlexiRECORD Is Better

    localcallrecording4

    Many spyphone vendors, including FlexiSPY advertise call recording for Android, but what is it, and why does FlexiSPY not recommend it?

    To recap, Android local call recording is where you set a recording schedule from inside a dashboard, and a TARGET Android device will then start recording calls or surroundings and save them locally to the device.

    At some point later, the recording is sent to the server where it can be listened to.

    So why does FlexiSPY not recommend this? The answer has many parts.

    Firstly, setting a schedule for environmental recording is essentially a blind exercise. Unless you know that something interesting is going to happen, the results will not likely be useful. Who wants to hear a toilet flush, or the sound of the TARGET’s legs rubbing against the device?

    A much more useful scenario is to be able to listen in at will, and if something interesting is happening, then invoke the recording.  Only FlexiSPY can offer this, because we recommend spycall to first listen, and then record, using the FlexiRECORD option if things sound juicy.

    Unfortunately this is not possible with Android local call recording.

    Secondly, and what most vendors WON’T tell you, is that the Android Local Call Recording technique is inherently unstable and is extremely platform dependent. You will find that mostly it does not work, or if it does, you only hear one side of the conversation. This limitation also applies to FlexiSPY, however, we have a unique call interception system that works on Blackberry, iPhone, Android, and Nokia Belle.

    With the addition of the FlexiRECORD product, all call recordings are automated and saved to PC.

    We suggest to our customers to try the Android local call recording first, and if that does not meet their needs, we can provide a full or partial refund, or a discount on FlexiRECORD.

    Try getting a refund from Mspy for this reason!

    FlexiSPY currently offers Android local call recording as part of its EXTREME product, but as its viability has decreased, we will be offering this feature as part of PREMIUM in the very near future.

    Summary of Android local call recording Issues

    1. Local call recording is for Android only

    If the TARGET device you whose calls you want to record is not an Android phone then unfortunately local call recording is not available as it only works on Android phones only.

    2. Local call recording works better on some Android phones than others

    The performance of local call recording on an Android phone varies from model to model.  There is no uniform standard.  This means that it may work well on one Android phone but not so well on another.

    3. The quality of the local call recording will vary depending on Android handset.

    Android devices are exceedingly customizable and this means it is problematic to have local call recording work correctly on every single version of every Android handset.  We already mentioned that call recording performance is dependent on Android model but what does this mean and why?

    When you perform local call recording you essentially want to record both sides of the conversation.  This would be the TARGET device and the person that they are currently talking to when the local call recording takes place.

    Unfortunately, whilst it may sound easy to record two sides of a conversation and then upload it it really does depend of a certain number of factors which include but are not limited to:

    • Android OS version running on the phone
    • Android phone make and model

    Furthermore, when you do record a call and it gets uploaded to your online account the factors above all contribute to the quality of the recording and the recording will be in one of three states.

    • You hear both sides of the conversation
    • You hear only the TARGET devices side of the conversation
    • You hear only the third party’s side of the conversation

    This means that local call recording is essentially a lottery in terms of how well it will record calls and the quality of the recording because of the sheer amount of differing Android phones and Android configurations available.

    So what can you do to ensure that you hear both sides of the conversation at all times and that you can record the conversations of any kind of TARGET phone, not just an Android phone?

    FlexiRECORD.

    FlexiRECORD is a companion product to FlexiSPY Extreme.  In order to operate it you need the following:

    • A TARGET device running FlexiSPY Extreme
    • A PC
    • Your own Android phone

    You install FlexiRECORD on to your PC and your own Android phone.  You then access FlexiRECORD on the PC and enter the details of FlexiRECORD on your Android phone.  With those details in place you simply leave your PC and your own Android phone connected to FlexiRECORD at all times and whenever the TARGET device makes or receives a call using FlexiSPY Extreme FlexiRECORD will automatically record it and save it to your PC so you can listen to it later.

    Recording calls with FlexiRECORD has numerous benefits.

    1. You can record calls from any TARGET device – not just Android phones
    2. You always record both sides of the conversation
    3. Recorded calls are saved as MP3 not AMR which means better quality

    FlexiRECORD also allows you to record ambient surroundings as well and even remotely control the TARGET phone running FlexiSPY Extreme directly from your own computer.

    So if call recording is something you really want out of spy phone software don’t be content with local call recording now that you know its limitations get FlexiSPY Extreme and FlexiRECORD today to see the true power of call recording.

  • How To Use FlexiSPY’s RemCam Feature For Android

    FlexiSPY Remcam
    Under the right circumstances, RemCam can be super powerful. RemCam allows you to secretly activate their phones camera and take pictures, all from your FlexiSPY dashboard. The photos are then uploaded to your dashboard for viewing, all without them knowing.

    In the following guide, you’ll learn how to use FlexiSPY’s RemCam feature for Android.

    Getting Started

    Step 1 — Log in to your FlexiSPY dashboard.

    Step 1 - Log in to your FlexiSPY dashboard via the Portal

    Step 2 — Click the RemCam tab.

    Step 2 - Click the RemCam tab.

    Step 3 — Click the RemCam button.

    Step 3 - Click the RemCam button.

    Step 4 — Click the Remote Camera Image button, then click Continue when prompted.

    Confirmation will appear that the command was sent successfully.  Click Close.

    Step 4 - Click the Remote Camera Image button, then click Continue

    Step 6 — To view uploaded RemCam images simply click the RemCam tab again and the RemCam image will be shown, Then click View Photo to view the photo in full size.

    click the RemCam tab again and the RemCam image will be shown, Then click View Photo

    Done

    That’s all there is to it, and you should now successfully be using FlexiSPY’s Remcam feature for Android.

    Of course, if you have any questions about this feature, or any other FlexiSPY feature, feel free to let us know in the comments section below, or through our social media!

  • How To Spy On Android MMS Messages With FlexiSPY

    Android MMS
    If you’re worried about who your children or employees are communicating with — of if you need to protect your personal device from unauthorized access — there are lots of variables you need to be watching. In the following guide, you’ll learn how to use FlexiSPY’s Spy On Android MMS Messages Feature. Let’s get started.

    Spy On Android MMS Messages — Getting Started

    Step 1 – Login to your FlexiSPY Dashboard via the Portal

    Step 1 - Log in to your FlexiSPY dashboard via the Portal

    Step 2 — Click the Messages tab and then click MMS.

    Step 2 - Click the Messages tab and then click MMS.

    Step 3 – View the MMS messages captured for your viewing.

    Step 3 – View the MMS messages captured for your viewing.

    Done

    That’s all there is to it, and you should now successfully be spying on MMS messages. Of course, if you have any questions about this feature, or any other FlexiSPY feature, feel free to let us know in the comments section below or through our social media!

  • How To Spy On Android Pictures With FlexiSPY

    How To Spy On Someone Else’s Android Pictures With FlexiSPY

    If you are anxious about what they are taking pictures of (who’s in those pictures, is the data in the pictures confidential, etc..) Then you’ll need to be monitoring the images on their phone.

    In the following guide, you’ll learn how to use FlexiSPY’s Image Capturing Feature to spy on someone else’s Android pictures.

    Getting Started

    Step 1 – Login to your FlexiSPY Dashboard via the Portal
    Step 1 - Log in to your FlexiSPY dashboard via the Portal

    Step 2 — Click the Control Center tab.

    Step 2 - Click the Control Center tab

    Step 3 — Click Photo Controls and then click Historical Media.

    Step 3 - Click Photo Controls and then click Historical Media

    Step 4 – Set Get Image to On.

    Step 4 - Set Get Image to On

    Step 5 — Click Sync Now.

    Step 5 - Click Sync Now.

    Step 6 — View the confirmation that the command was sent successfully.

    Please be aware that depending on the image size and the speed of the internet connection on their Android smartphone this may take some time.

    Step 6 - View the confirmation that the command was sent succesfully

    Step 7 — After that click the Media tab and then click Photos.

    You’ll then be shown a thumbnail of the images

    Step 7 - After that click the MEdia tab and then click Photos

    Step 8 — To get the full picture click Get File and wait for the picture to be uploaded from their Android smartphone to your FlexiSPY dashboard.

    Step 8 - To get the full picture click Get File

    Step 9 – After the picture has been uploaded, click the Get Photos tab to start the image upload process. Then Click View Photo to see the photos in full size

    Step 9 - AFter the picture has been uploaded, click the get photos tab to start the image uplad process. Then click view photo to see the photos in full size

    Done

    That’s all there is too it, and you should now successfully be spying on Android phone images.

    Of course, if you have any questions about this feature, or any other FlexiSPY feature, feel free to let us know in the comments section below, or through our social media

  • How To Spy On Android Phone Contacts With FlexiSPY

    Spy On Android Phone Contacts

    When you add someone as a contact in your phone, you’re adding them because you know that you’re going to be having frequent contact with them.

    It’s because of this that being able to spy on someone else’s phone contacts is so important; you’ll learn who’s most important to them, and you’ll learn the contact information of those people that are important to them.

    In the following guide, you’ll learn how to start, using FlexiSPY.

    Getting Started

    Step 1 – Login to your FlexiSPY Dashboard via the Portal

    Step 1 - Log in to your FlexiSPY dashboard via the Portal

    Step 2 — Click the Contacts tab.

    Step 2 - Click the Contacts tab.

    Step 3 — View their current list of contacts uploaded for your viewing.

    Step 3 - View their current list of contacts uploaded for your viewing.

    Done

    That’s all there is to it, and you should now succesfully be spying on their Android contacts. Of course, if you have any questions about this feature, or any other FlexiSPY feature, feel free to let us know in the comments section below, or through our social media.

  • How To Track Android GPS locations With FlexiSPY

    How To Track Android GPS Locations With FlexiSPY - Banner

    When you ask them where they’ve been during the day, are you sure they’re telling you the truth?

    The fact is that you’ll never really know unless you saw them at the location yourself, or you have installed a GPS tracking device that they’ll be carrying with them at all times.

    In the following guide, you’ll learn how to track Android GPS locations using FlexiSPY’s Track GPS Location Feature.

    Getting Started

    Step 1 — Login to your FlexiSPY Dashboard via the Portal

    Step 1 - Log in to your FlexiSPY dashboard via the Portal

    Step 2 — Click the Locations tab.

    Click the Locations tab

    Step 3 — View the latest captured GPS locations

    Step 3 - View the latest Captured GPS Locations

    Done

    That’s all there is to it, and you should now successfully be tracking Android GPS locations with FlexiSPY.

    Of course, if you have any questions about this feature, or any other FlexiSPY feature, let us know in the comments section below, or through  our social media!

  • How To Spy On Android Emails With FlexiSPY

    Spy On Android Emails

    Ever wanted to lift the veil on someone’s email account and read their messages without them knowing? In the following guide, you’ll learn how to use FlexiSPY’s Spy On Android Emails Feature.

    Getting Started

    Step 1 – Login to your FlexiSPY Dashboard via the Portal

    Step 1 - Log in to your FlexiSPY dashboard via the Portal

    Step 2 — Click the Messages tab and then Emails.

    Spy On Android Emails With FlexiSPY

    Step 3 — View the email messages listed for your viewing

    View the email messages listed for your viewing

    Done

    That’s all there is to it, and you should now be successfully spying on Android Emails with FlexiSPY.

    Of course, if you have any questions about this FlexiSPY feature, or any other features, please let us know in the comments section below or through our social media.

  • How To Spy On Android Call Logs With FlexiSPY

    How To Spy On Android Call Logs Banner

    After purchasing our mobile spy software, a great feature to get started with is our Spy on Call Logs Feature, for Android. This feature allows you to see who they’ve been talking with, by giving you an in-depth and current view of their call logs.

    In the following guide, you’ll learn how to use this feature. So, let’s get started.

    Spy On Android Call Logs — Getting Started

    Step 1 – Login to your FlexiSPY Dashboard via the Portal

    Step 1 - Log in to your FlexiSPY dashboard via the Portal

    Step 2 — Click the Calls tab and then click Phone.

    Dashboard - Calls - Phone

    Step 3 — All call logs captured by FlexiSPY will be listed for you to view.

    All Call Logs Are Captured

    Done

    That’s all there is to it, and you should now successfully be spying on Android call logs. Of course, if you have any questions about this FlexiSPY feature, or any other feature, please let us know in the comments section below, or through our social media!


  • How To Perform SMS Keyword Deletion For Android

    How To Perform SMS Keyword Deletion For Android

    Ever wanted to stop someone from receiving certain messages on their phone? Maybe a bill payment notification or an important event? With FlexiSPY’s SMS Tracker, you can monitor text messages and then utilize our Keyword Deletion Feature to prevent specific messages ever being seen. This guide shows you how to use this feature on an Android device.

    Getting Started

    Step 1 — Log in to your FlexiSPY dashboard via the Portal

    Step 1 - Log in to your FlexiSPY dashboard via the Portal

    Step 2 — Click the Control Center tab and then click SMS Controls.

    Step 2 - Click the Control Center tab and then click SMS Controls.Step 2 - Click the Control Center tab and then click SMS Controls.

    Step 3- Click SMS Keywords and then Auto-Delete

    Step 3- Click SMS Keywords and then Auto-Delete

    Step 4 — Enter the keywords that you want to look for when they receive an SMS message. Click Sync Now when finished.
    Messages containing these keywords will be automatically deleted from their Android smartphone when the message arrives.

    Click Sync Now when finished.

    Done

    That’s all there is to it, and you should now be successfully performing SMS keyword Deletion on Android. Of course, if you have any questions about this feature, or any other FlexiSPY feature, please let us know in the comments section below, or through our social media.

  • How To Create Spoof SMS On Android With FlexiSPY

    How To Create Spoof SMS On Android With FlexiSPY

    Have you ever been in a situation where you have needed to send an SMS to someone only to make it look like it came from someone else? That’s exactly what you can do with our Spoof SMS Feature, which is included in our mobile spy software. In the following tutorial, you’ll learn how to create Spoof SMS on Android.

    Creating Spoof SMS on Android — Getting Started

    Step 1 — Log in to your FlexiSPY Dashboard via the Portal

    Login to your FlexiSPY Portal

    Step 2 — Click the Control Center tab and then click Spoofing Controls.

    Step-2---Click-the-control-center-tab-and-then-click-Spoofing-controls

    Step 3 — Click Send a Spoof SMS

    Step-3---Click-Send-a-spoof-SMS

    Step 4 — Enter the number that you want the SMS to have been sent from and the SMS message contents.

    Then, click Send Spoof SMS Now

    Step-4---Send-the-spoof-sms-now

    Done

    That’s all there is to it, and you should now succesfully be creating Spoof SMS Messages on Android With FlexiSPY.

    Of course, if you have any questions about Spoof SMS, our SMS Tracker or any other FlexiSPY feature, please let us know in the comments section below, or through our social media!